Desserts
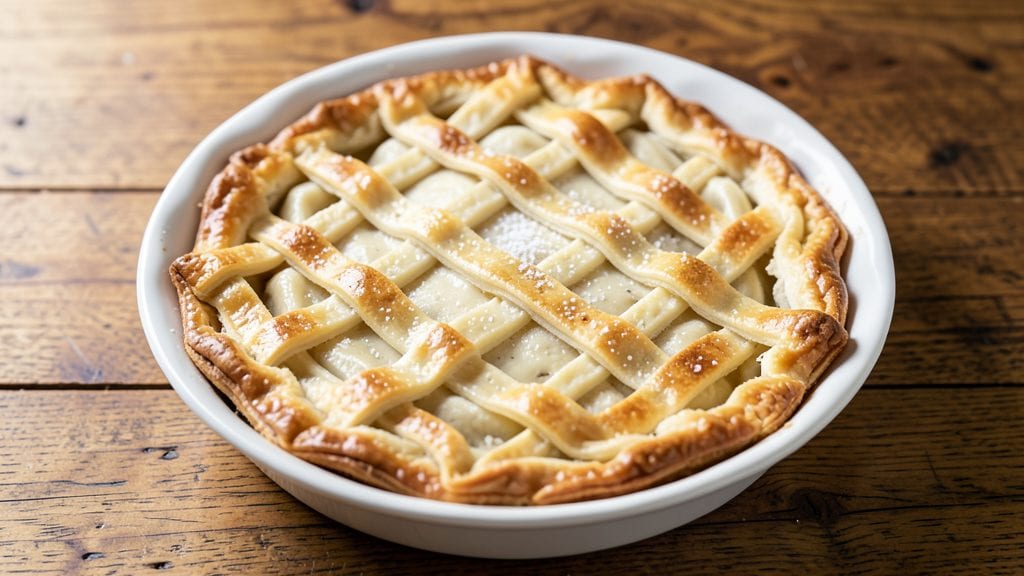
Creating a perfect pie pastry doesn’t require rolling skills or expensive tools—just this Betty Crocker-inspired no-roll method that guarantees a flaky, golden crust every time. The secret lies in cold butter and precise technique, transforming simple ingredients into a foolproof foundation for any pie.
I’ve tested this recipe countless times, and it never fails to deliver crisp edges and tender layers, even with beginner bakers.
This recipe uses just five ingredients—flour, butter, salt, sugar, and cold water—to create a versatile crust that works for both sweet and savory pies. The dough comes together in minutes with minimal handling, then rests in the fridge while you prepare your filling.
No rolling pin? No problem. Simply press the dough gently into your pie dish for an even, professional-looking base.
What makes this crust truly special is its adaptability—whether you’re baking a classic apple pie, a rich pecan tart, or a savory chicken pot pie, this dough handles it all. The pre-baking step ensures your crust stays crispy, not soggy, while the buttery layers create that signature flakiness.
Once you try this method, you’ll never go back to store-bought crusts again.
Ready to master the art of pie-making? This recipe delivers restaurant-quality results with minimal effort, and I’ll walk you through every step—from mixing to baking—so your pies turn out perfect every time. Let’s get started!
Ingredients for betty crocker pie pastry
Five simple ingredients transform into a golden, flaky pie crust without rolling or stress.
| Ingredient | Amount | Notes |
|---|---|---|
| All-Purpose Flour 🌾 | 2 ½ cups | Sifted for light texture |
| Unsalted Butter 🧈 | 1 cup | Cold, cubed, not melted |
| Granulated Sugar 🍚 | 1 tbsp | For slight sweetness |
| Fine Sea Salt 🧂 | ½ tsp | Enhances flavor balance |
| Ice Water 💧 | ½ cup | Chilled, for binding |
The butter is non-negotiable—it needs to be stone-cold when you mix it in. Store-brand butter works perfectly fine, but avoid anything with additives or high water content. Cut it into 1/2-inch cubes so it distributes evenly in the flour. For the flour, I always sift it first—Bob’s Red Mill or King Arthur are my go-tos, but any all-purpose will do. The sugar and salt? Just a pinch each, but they’re what make this crust taste like you actually made it from scratch (not that store-bought is bad—just different).
No cold water? Freeze your ice water cubes for 10 minutes before using. The dough should come together with minimal handling—if it’s too sticky, add 1 tbsp more flour. Want extra flakiness? Use 1/2 cup lard instead of half the butter. No lard? Don’t sweat it—the butter version is still amazing. And if you’re short on time, microwave the butter cubes for 10 seconds to soften just enough to mix, then chill the dough for 15 minutes. Trust me, it works.
This dough is a game-changer for meal prep—make it ahead and store it in the fridge for up to 4 days, or freeze it for 3 months. Wrap it tightly in plastic wrap, then foil, to prevent drying. When you’re ready to use it, let it sit at room temperature for 15-20 minutes before pressing into your pie dish. The secret to crisp edges? Pre-bake the crust for 15 minutes at 375°F before adding your filling—no soggy bottoms here.
Why You'll Love This Recipe
- No-Fuss Foundation: I’ve made this pastry a dozen times—just flour, butter, sugar, and ice water—no fancy techniques. The butter gets cut into the flour until it’s pea-sized, then ice water brings it together without overworking. Honestly, it’s the kind of recipe that makes me feel like I’ve actually done something in the kitchen.
- Buttery Crisp Magic: That moment when the edges turn golden while the center stays tender? Pure satisfaction. The sugar in the dough caramelizes just enough to give it a subtle sweetness, but it’s the cold butter that keeps it flaky. Between us, it’s the kind of pastry that makes store-bought crusts look like a sad afterthought.
- Pie Pan to Party: This dough works for pies, hand pies, or even a quick galette—no need to stress over shapes. I’ve used it for apple, cherry, and even a savory chicken pot pie, and it holds up every time. Here’s what sold me: it’s the ultimate crowd-pleaser that doesn’t require a Pinterest-perfect presentation.
- Budget-Friendly Staples: Flour, butter, sugar, salt—these are ingredients I already have on hand. No specialty items, no last-minute grocery runs. And because it keeps well in the fridge for days, I can make a big batch for the week. Not the prettiest, but the taste makes up for it—and my wallet stays happy.
Step-by-step instructions for Betty Crocker pie pastry recipe
Here's the secret to a foolproof, no-roll crust that delivers perfect pies every single time—no stress, no mess!
Mix Dry Ingredients for a Light, Airy Base
In a large mixing bowl, combine the 2.5 cups all-purpose flour, 1 tablespoon granulated sugar, and 0.5 teaspoon fine sea salt. I like to whisk these together briefly with a fork to ensure the sugar and salt are evenly distributed throughout the flour. This step is crucial because it prevents any clumps from forming later when we add the butter.
The sugar adds just a touch of sweetness that balances the richness of the butter, while the salt enhances all the flavors in your pie filling. Don't skip this—it's what makes this crust taste like it came from a professional bakery. Once everything is thoroughly mixed, set the bowl aside for the next step.
Cut in Cold Butter for Flaky Layers
Add the 1 cup cold, cubed unsalted butter to the flour mixture. Using a pastry cutter or two forks, cut the butter into the flour until the mixture resembles coarse crumbs with some pea-sized butter pieces remaining. This is where the magic happens—the cold butter creates those beautiful flaky layers when baked.
Work quickly but don't rush—you want to keep everything cold. If the butter starts to melt, pop the bowl in the freezer for 2-3 minutes to firm it up again. The goal is to have a mixture that looks like wet sand with some larger butter pieces still visible. This texture is perfect for creating that signature flaky, tender crust.
Add Ice Water Gradually for Perfect Binding
Now for the most critical step—adding the 0.5 cup ice water. I always use ice water because it's colder and helps prevent the butter from melting too quickly. Sprinkle the water 1 tablespoon at a time over the flour mixture while gently stirring with a fork. Be careful not to overmix—just combine until the dough comes together when pressed.
You'll know you've added enough water when the dough holds its shape when pressed in your hand but isn't sticky. If it's too dry, add a little more ice water; if it's too sticky, sprinkle in a bit more flour. The dough should be just firm enough to handle without falling apart. This is the consistency you want for a perfect pie crust.
Shape and Chill for Maximum Flakiness
Turn the dough out onto a lightly floured surface and gently shape it into a disk about 1-inch thick. Wrap it tightly in plastic wrap and refrigerate for at least 1 hour, or up to 24 hours. This chilling step is non-negotiable—it firms up the dough and prevents it from shrinking when it goes into the oven.
Here's the thing—chilling also allows the gluten to relax, which means your crust will be tender rather than tough. I like to press the dough gently against the plastic wrap to create an even shape. This makes it much easier to roll out later without tearing. Don't skip this step, no matter how excited you are to get baking!
Roll and Fit into Your Pie Dish
After chilling, remove the dough from the refrigerator and let it sit at room temperature for 5-10 minutes to soften slightly. This makes it easier to handle without cracking. On a lightly floured surface, roll the dough out to a 12-inch circle—just slightly larger than your pie dish.
Gently fold the dough in half and unfold it, then carefully transfer it to your pie dish. Unfold it and press it gently into the bottom and up the sides. Here's a pro tip: I like to use a rolling pin to gently press the dough into the corners of the dish to ensure good coverage. Trim any excess dough hanging over the edge with a sharp knife. This crust is so easy to work with, you'll be amazed!
Pro Tips For Making Betty Crocker Pie Pastry
- Chill the Butter First: The Betty Crocker recipe calls for cold butter, but I’ve learned the hard way—really cold means cutting it into cubes and sticking them in the freezer for 10 minutes before mixing. Warm butter from the fridge will make your pastry greasy and tough, no matter how much flour you add.
- Cut Butter in Small Batches: Don’t dump all the butter into the flour at once—work in 2-tablespoon chunks while mixing. This keeps the butter from melting into a paste, which guarantees a flaky crust. I used to rush this, and my crust ended up more like a biscuit than a pie shell.
- Use Ice Water Sparingly: The recipe says “ice water,” but don’t overdo it—just enough to hold the dough together. Too much water makes the pastry dense. I now measure it by the teaspoon: start with 3 tablespoons, then add more only if the dough feels dry when pressed.
- Rest the Dough—Even If You’re Impatient: Wrap the dough in plastic and let it sit for at least 30 minutes before rolling. This relaxes the gluten, so it won’t shrink when baked. I know, I know—you want to get straight to pie-filling time—but skipping this step means a wonky crust. Trust me.
Perfect pairings for this recipe
Sweet Fillings
This versatile crust pairs perfectly with classic sweet fillings like apple pie or peach cobbler.
For apple pie, use a mix of tart Granny Smith and sweet Honeycrisp apples—about 6 cups sliced—tossed with ½ cup brown sugar, 2 tbsp lemon juice, and 1 tsp cinnamon. The crust’s buttery layers hold up beautifully to juicy fillings, preventing sogginess. 🍏
For a pecan pie, press the crust into a 9-inch pie dish, then bake at 375°F for 15 minutes before adding the filling. The pre-baked crust creates a sturdy base for the creamy pecan mixture.
I love adding a lattice top for a rustic touch—just roll out half the dough and cut it into ½-inch strips before weaving it over the filling.
Savory Options
Don’t limit this crust to desserts—it’s fantastic for savory pies too! Try a chicken pot pie by lining a 9x13-inch baking dish with the dough, then filling it with shredded rotisserie chicken, cream of mushroom soup, and frozen peas.
The crust’s flaky texture contrasts perfectly with the creamy filling. 🍗
For a quiche, press the dough into a 9-inch pie dish, prick the bottom with a fork, and blind-bake for 12 minutes at 375°F. Then fill with 6 eggs, 1 cup heavy cream, 1 cup shredded cheese, and your favorite veggies.
The crust stays crisp even after baking with wet fillings.
Gluten-Free Adaptation
For a gluten-free version, swap the all-purpose flour for a 1:1 gluten-free blend like Bob’s Red Mill or King Arthur. Add 1 tbsp xanthan gum to help bind the dough.
Chill the dough for at least 2 hours to compensate for the lack of gluten structure. This works surprisingly well for berry pies or cheesecake crusts. 🌾
Toppings & Garnishes
Before baking, brush the crust with melted butter for extra shine and richness. For a lattice top, use the remaining dough to create a geometric pattern—just roll it out, cut into strips, and weave over the filling. A sprinkle of coarse sugar before baking adds a beautiful crunch. 💫
After baking, finish with powdered sugar dusting for desserts or fresh herbs like thyme for savory pies. A drizzle of honey or caramel sauce elevates the presentation to restaurant-quality. The crust’s neutral flavor lets the fillings shine while adding that essential buttery crunch.
Nutrition facts
Frequently asked questions
Can I make this pie crust without a rolling pin?
This recipe is designed for a no-roll method. Simply press the chilled dough gently into your pie dish using your fingers or a measuring cup. For extra ease, fold the dough in half, unfold it, then transfer to the dish to prevent tearing. The crust will still turn out beautifully flaky and even.
Why does my dough keep sticking to my hands?
Sticky dough usually means you've added too much water or your butter isn't cold enough. To fix it, sprinkle a little more flour on your surface and hands, then gently knead just until the dough comes together. If it's still too wet, let it rest in the fridge for an extra 15 minutes to firm up. The dough should hold its shape when pressed but not be gluey.
Can I use this crust for deep-dish pies?
Yes, but you'll need to adjust the technique. For deep-dish pies (like chocolate cream or key lime), press the dough into your dish, then add a second layer of dough on top of the filling. Crimp the edges together and cut slits for steam to escape. Bake as directed, but you may need to add 10-15 extra minutes to fully cook the center. The extra dough layer prevents sogginess.
How do I prevent a soggy bottom in my pie?
The secret is pre-baking the crust! Blind-bake your crust (with pie weights or dried beans) at 375°F for 15 minutes before adding filling. For extra insurance, brush the pre-baked crust with a thin layer of egg wash or apricot jam before adding your filling. This creates a moisture barrier that keeps the crust crisp.
What's the best way to store leftover crust?
Wrap the unused dough tightly in plastic wrap, then place it in a sealed container or freezer bag. It'll keep in the fridge for up to 4 days or in the freezer for 3 months. For best results, let it sit at room temperature for 15-20 minutes before using to prevent cracking. The cold dough is easier to handle when you're ready to assemble your pie.