Desserts
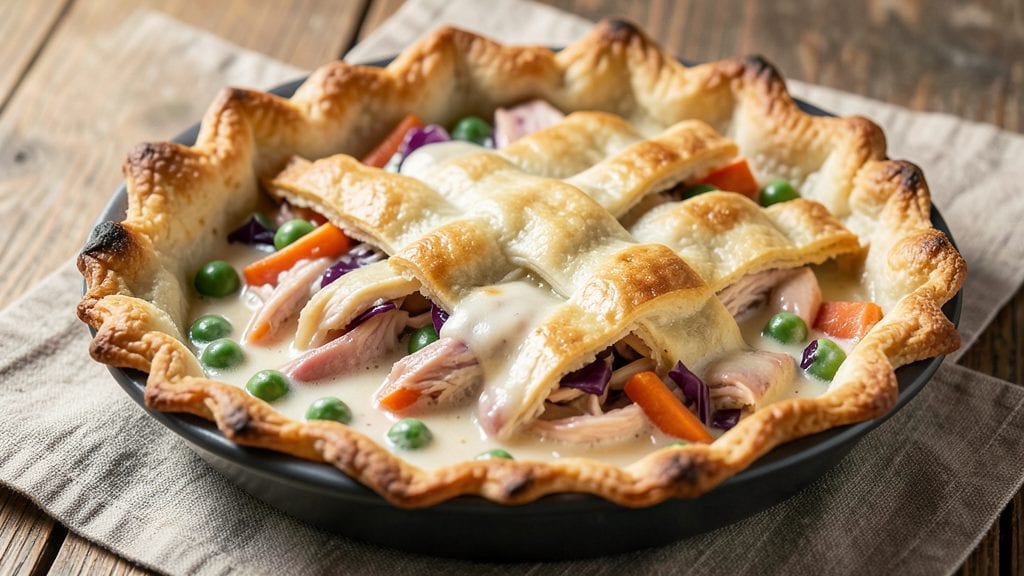
This Pillsbury pie crust pot pie recipe transforms a simple one-pan meal into a restaurant-worthy centerpiece—where golden, flaky layers hug tender chicken, vegetables, and creamy filling. The beauty of using pre-made crust means you skip the rolling and folding while still achieving that buttery, crispy finish.
I developed this recipe during a particularly busy week when I needed a comforting meal that felt special, not stressful.
The secret to this pot pie lies in the filling—juicy chicken thighs (never dry breast meat), fresh seasonal vegetables, and a rich, velvety broth that binds everything together.
While the crust bakes to a perfect golden brown, the filling stays moist and flavorful, creating that ideal contrast between crispy top and tender interior. The best part? It all comes together in one dish, with minimal cleanup.
What you'll end up with is a pot pie that smells like home the moment it comes out of the oven—warm, inviting, and packed with layers of savory goodness. The flaky crust creates a satisfying crunch with every bite, while the filling delivers hearty comfort.
This is the kind of dish that transforms a regular weeknight into a cozy family dinner without requiring hours in the kitchen.
Serve it with a simple green salad or crusty bread to soak up every last drop of that creamy filling. The leftovers reheat beautifully, making it perfect for meal prep or feeding a crowd. Let's get started with this foolproof recipe that delivers professional results with minimal effort.
Ingredients for pillsbury pie crust pot pie
Six ingredients make this pot pie magic—flaky crust, juicy chicken, creamy filling, and zero stress.
| Ingredient | Amount | Notes |
|---|---|---|
| Pillsbury Pie Crust (Ready-to-Use) 🥧 | 1 sheet | Thawed if frozen, not pre-baked |
| Boneless, Skinless Chicken Thighs 🍗 | 2 lbs | Juicy, never breast meat |
| Cream of Chicken Soup (Condensed) 🥛 | 1 can | Homemade or quality brand |
| Heavy Cream 🥛 | ½ cup | Full-fat for richness |
| Whole Milk 🥛 | ½ cup | Warmed for smooth texture |
| Frozen Mixed Vegetables 🥦 | 2 cups | Peas, carrots, corn blend |
| Yellow Onion 🧅 | 1 whole | Diced, medium size |
| Garlic Cloves 🧄 | 3 cloves | Minced, fresh preferred |
| Chicken Broth 💧 | 1 cup | Low-sodium preferred |
| All-Purpose Flour 🌾 | 1 tbsp | For thickening filling |
| Salt 🧂 | 1 ½ tsp | Kosher or sea salt |
| Black Pepper 🌶️ | ½ tsp | Freshly ground preferred |
| Dried Thyme 🌿 | ½ tsp | Or 1 tsp fresh thyme |
| Butter 🧈 | 2 tbsp | Melted, for crust brushing |
The Pillsbury pie crust is your secret weapon here—no rolling, no fuss, just that perfect golden crunch. Grab a double-crust sheet from the refrigerated section (the ones with the lattice pattern look fancy but work too). If you're short on time, thaw it in the microwave for 2 minutes instead of waiting for the oven. For the chicken, thighs are non-negotiable—they stay juicy while breasts turn dry. I always grab mine from the butcher counter if possible, but the pre-packaged ones at Kroger or Walmart work perfectly fine. Look for plump, meaty thighs with good marbling—they'll stay tender even after baking.
No cream of chicken soup? Homemade roux + broth works just as well—just simmer 2 tbsp butter, 2 tbsp flour, and 1 cup broth until thickened, then add milk and cream. Heavy cream too expensive? Half-and-half or whole milk stretches it further (though the texture gets slightly thinner). Frozen veggies are perfect here—no chopping, no waste—but if you've got fresh, peas, carrots, and corn are the classic combo. The onion and garlic can be swapped for leeks or shallots if you're feeling fancy, but regular yellow onion does the job beautifully. And if you're out of thyme? Dried oregano at half the amount keeps things flavorful.
This pot pie reheats like a dream—microwave 2 minutes covered, or 350°F for 15 minutes to crisp the crust again. Leftovers keep for 4 days in the fridge or 3 months frozen (wrap tightly in foil). For meal prep, portion into individual servings before freezing—just pop one in the oven when you're ready. The crust gets crispier the second time around, so don't skip reheating! And pro tip: brush the top with melted butter before baking for that extra-golden finish.
Why You'll Love This Recipe
- No-Rolling Required: I swear by this shortcut—just unfold the Pillsbury crust, no fussing with dough. The flaky layers melt into that golden, crispy top while the filling bakes, and honestly? It’s the kind of recipe that makes me feel like I did something when I didn’t even break a sweat.
- Creamy Chicken Magic: That combo of condensed soup, heavy cream, and milk creates a filling so rich and velvety, it’s like someone poured love into a skillet. The chicken thighs stay juicy while soaking up all that flavor—no dry bites here, just pure, comforting goodness in every spoonful.
- Leftover Heaven: Between us, this pot pie begs to be made twice. The leftovers reheat beautifully—just a splash of milk to loosen things up—and taste just as good the next day. I’ve sent this to work lunches, packed it for road trips, and even frozen portions for lazy Sundays. It’s my secret weapon for not cooking.
- Budget-Friendly Feast: Chicken thighs and a box of soup stretch into a meal that feeds four (or five if someone’s hungry). The Pillsbury crust adds that restaurant-worthy finish without the price tag. Plus, it’s the kind of dish where the flavors shine bright enough that no one will guess it’s not homemade from scratch.
Step-by-step instructions for Pillsbury pie crust pot pie
Here's how to create a restaurant-quality pot pie with flaky layers and rich, savory filling.
🍳 Step 1: Sear the Chicken Thighs for Maximum Flavor
Pat the 2 lbs boneless, skinless chicken thighs dry with paper towels—this ensures a better sear. Heat a large oven-safe skillet over medium-high heat and add the chicken thighs in a single layer. Let them sear undisturbed for 4-5 minutes until golden brown on one side. You'll see those beautiful crusty edges forming—that's your signal to flip.
Flip the chicken and continue cooking for another 3-4 minutes until the second side is also golden brown. Remove the chicken from the skillet and set it aside on a plate. The residual heat will keep it warm while you build the filling. Don't be tempted to overcrowd the pan—this prevents even browning and proper cooking.
👨🍳 Step 2: Build the Savory Filling with Perfect Texture
In the same skillet (no need to wipe it clean—those browned bits are flavor gold), add 2 tablespoons butter over medium heat. Once melted, add the diced yellow onion and cook for 5 minutes until softened and translucent. Add the 3 cloves minced garlic and cook for another 30 seconds until fragrant—this prevents bitter garlic flavors.
Sprinkle 1 tablespoon all-purpose flour over the onions and garlic, stirring constantly for 1 minute to cook off the raw flour taste. Pour in 1 cup chicken broth and stir to combine, letting it simmer for 2 minutes until slightly thickened. Add the 2 cups frozen mixed vegetables and stir gently to warm through.
🥘 Step 3: Create the Creamy Base for the Filling
Return the seared chicken thighs to the skillet along with any accumulated juices. Add the 1 can cream of chicken soup (condensed), 0.5 cup heavy cream, and 0.5 cup whole milk. Stir well to combine all ingredients, then sprinkle with 1.5 teaspoons salt, 0.5 teaspoon black pepper, and 0.5 teaspoon dried thyme. Bring to a gentle simmer over medium-low heat for 5 minutes to let the flavors meld.
Here's where the magic happens: the filling should be thick enough to coat the back of a spoon but still have a creamy consistency. If it's too thick, add a splash of chicken broth to loosen it. The chicken should be fully cooked through and falling off the bone when tested with a fork. Remove from heat and let it cool slightly for 5 minutes—this prevents the crust from getting soggy when you add it later.
🍳 Step 4: Assemble the Pot Pie with Flaky Layers
Preheat your oven to 375°F while you prepare the crust. Unroll the 1 sheet Pillsbury pie crust (ready-to-use) on a clean surface and cut it into two equal rectangles. You'll use one rectangle for the bottom and one for the top.
Spread the chicken and vegetable filling evenly into the skillet, creating a layer about ½-inch thick. Place one crust rectangle over the filling, pressing gently to seal the edges. Trim any excess crust hanging over the sides. Cut several small slits in the top crust to allow steam to escape during baking—this prevents a soggy top.
⏰ Step 5: Bake to Golden Perfection
Transfer the assembled pot pie to the preheated oven and bake for 35-40 minutes until the crust is deep golden brown and the filling is bubbling around the edges. The crust should be crispy and flaky, with no soft spots when pressed gently.
For extra browning, brush the top crust with a little melted butter (mix the remaining 2 tablespoons butter with 1 teaspoon water) and return to the oven for 5-7 minutes if needed. Let the pot pie rest for 10 minutes before serving—this allows the filling to set slightly and makes cutting easier. Serve warm with a side of crusty bread for dipping in the creamy filling!
Pro Tips For Making Pillsbury Pie Crust Pot Pie
- Sear Chicken First: After burning my first batch of pot pie filling, I learned to brown the chicken thighs in a skillet before adding them to the soup mix—it adds depth of flavor and prevents a bland, watery filling. Use medium-high heat and don’t overcrowd the pan, or you’ll steam instead of sear.
- Preheat That Crust: I used to skip this step and wondered why my crust always looked sad and soggy. Brush the Pillsbury pie crust with a little beaten egg white or milk, then bake it uncovered at 375°F for 8–10 minutes before adding the filling. It crisps up and holds its shape like a pro.
- Thin the Sauce Right: The condensed soup alone can turn gluey if you’re not careful. Stir in the heavy cream and milk gradually while the filling simmers—start with half, taste, then add more if needed. Too much liquid? Simmer uncovered for 2–3 minutes to thicken it back up.
- Vent That Top Crust: Forget lattice or slits? Just cut a few small steam holes in the top crust with a sharp knife before baking—this prevents a soggy bottom and lets the filling breathe. I promise, no one will notice the tiny cuts, but your pot pie will thank you.
Perfect pairings for this pillsbury pie crust pot pie
Creamy Filling Upgrades
Swap the heavy cream for coconut milk to make this dish dairy-free while keeping it rich. I use 1 can full-fat coconut milk instead of the cream and milk combo—it adds a subtle sweetness that pairs beautifully with the savory filling.
For extra depth, stir in 1 teaspoon Dijon mustard with the cream of chicken soup before adding other ingredients. 🥥
Crust Customizations
For a lattice-topped pot pie, cut the top crust into strips about ½-inch wide and weave them over the filling like a basket. This creates stunning visual appeal while allowing steam to escape.
If you prefer a crispier crust, bake the bottom crust alone for 8 minutes before adding the filling—this pre-baking trick prevents a soggy bottom. 🥧
Vegetable Swaps
Seasonal vegetables transform this pot pie. In summer, replace frozen veggies with fresh green beans, zucchini, and cherry tomatoes. For fall, try roasted sweet potatoes and Brussels sprouts—toss them in olive oil, salt, and pepper before adding to the filling.
Winter calls for caramelized mushrooms and leeks for an earthy flavor profile. 🍠
Protein Alternatives
Make this vegetarian by replacing chicken with chickpeas or white beans—simmer them with the onions and garlic until tender. For seafood lovers, add 12 large shrimp seared in the same skillet as the chicken (about 2 minutes per side).
Or swap in diced smoked sausage for a heartier, meatier version. 🦐
Herb & Spice Variations
Boost the flavor profile with fresh herbs. Add 2 tablespoons chopped parsley and 1 tablespoon chopped chives to the filling before baking for a bright finish. For a Mediterranean twist, swap thyme for 1 teaspoon dried oregano and add ½ teaspoon smoked paprika.
A pinch of nutmeg (about ¼ teaspoon**) adds warmth that pairs perfectly with the creamy filling. 🌿
Nutrition facts
Frequently asked questions
Can I use a different type of protein besides chicken?
Swap the chicken thighs for 12 large shrimp or 1 lb ground turkey—both work beautifully. For a vegetarian version, use 1 can chickpeas or white beans instead. Just make sure to adjust cooking times: shrimp cooks in 2 minutes per side while beans need 10 minutes of simmering with the filling.
How do I prevent a soggy crust?
Prevent sogginess by letting the filling cool for 5 minutes before adding the top crust. Also, cut small slits in the crust to release steam. For extra insurance, bake the bottom crust alone for 8 minutes before adding filling. Brushing the top crust with melted butter after baking creates a protective seal too.
Can I make this pot pie ahead of time?
Yes! Assemble the pot pie (without baking) and refrigerate for up to 24 hours or freeze for 3 months. When ready to bake, add 10-15 minutes to the baking time if frozen. Reheat leftovers covered in the microwave for 2 minutes or oven at 350°F for 15 minutes to restore crispiness.
What's the best way to store leftovers?
Store leftovers in an airtight container in the fridge for 4 days. For longer storage, wrap tightly in foil and freeze for up to 3 months. Reheat portions individually—this keeps the crust crispy. The filling reheats best when warmed gently, not microwaved directly from frozen.
Can I use homemade pie crust instead of Pillsbury?
Use any double-crust pie dough (homemade or store-bought). Roll it to ⅛-inch thickness for even baking. Homemade crust may need 5-7 extra minutes in the oven since it's thicker. Brush with egg wash (1 egg + 1 tbsp water) for extra shine and crispiness before baking.