Desserts
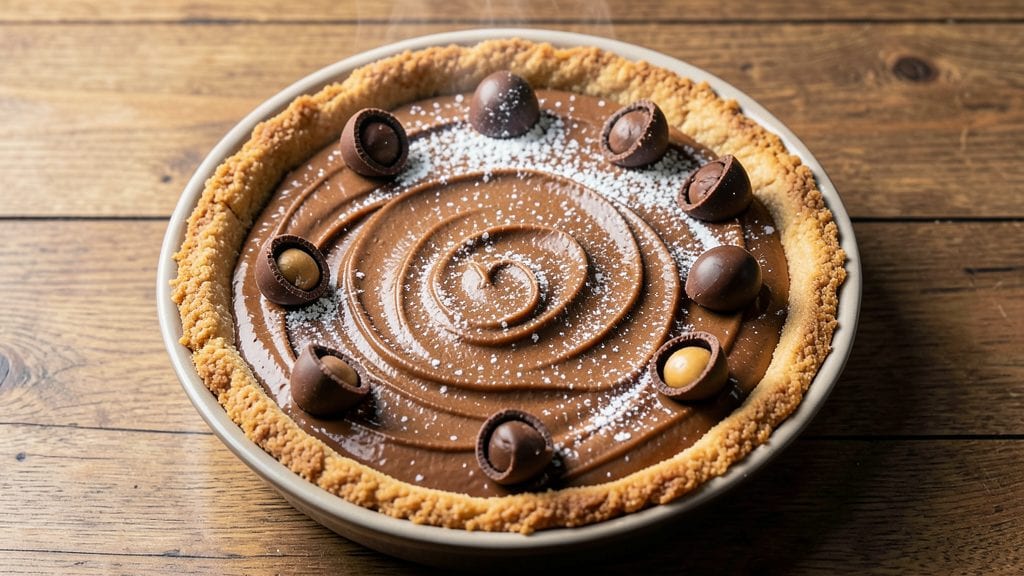
This peanut butter pie with Reese's peanut butter cups delivers the perfect marriage of rich, fudgy texture and crunchy chocolate bites in every slice.
The secret lies in a velvety peanut butter filling that swirls seamlessly with melted Reese's cups, creating a dessert that's both decadent and foolproof for home bakers. I developed this recipe after years of testing—balancing the right amount of sweetness and ensuring the filling stays smooth without cracking during baking.
The foundation starts with a classic graham cracker crust, reinforced with melted butter for extra stability, which is critical for holding up to the dense filling.
What sets this apart is the technique of chilling the filling for at least 4 hours (or overnight), a step that transforms the texture from sticky to perfectly set.
The Reese's cups are folded in just before baking, ensuring those iconic chocolate-peanut butter bites stay intact while the filling develops its signature creamy consistency.
By the time it emerges from the oven, you'll have a pie with a golden crust, a smooth peanut butter layer swirled with pockets of Reese's cups, and a clean break that reveals the perfect texture.
The aroma alone will have everyone gathering around the kitchen, and the first bite delivers that addictive combination of creamy peanut butter and crunchy chocolate. Serve it at room temperature with a dollop of whipped cream or a drizzle of melted chocolate for the ultimate indulgence.
This recipe is designed to be beginner-friendly while delivering restaurant-quality results—no special equipment required beyond a pie dish and a whisk. The key is patience during the chilling process and precise temperature control in the oven.
Whether you're celebrating a holiday or simply craving a classic dessert, this peanut butter pie will become your new go-to recipe.
Ingredients for peanut butter pie with reese's peanut butter cups
Your pantry already has most of these—just add Reese's cups for that iconic crunch.
| Ingredient | Amount | Notes |
|---|---|---|
| Graham Cracker Crumbs 🍪 | 2 ½ cups | Finely crushed, no large pieces |
| Unsalted Butter 🧈 | ½ cup | Melted, full-fat for richness |
| Granulated Sugar 🍚 | 1 ½ cups | Superfine preferred for smooth filling |
| Light Corn Syrup 🍯 | ½ cup | Karo brand works perfectly |
| Peanut Butter 🥜 | 2 cups | Creamy, natural style preferred |
| Large Eggs 🥚 | 4 whole | Room temperature for smooth texture |
| Vanilla Extract 🍃 | 2 tsp | Pure, high-quality preferred |
| Reese's Peanut Butter Cups 🍫 | 16 whole | Chopped into small pieces |
| Powdered Sugar 🍚 | ½ cup | For dusting top before serving |
| Heavy Whipping Cream 🥛 | 1 cup | Whipped for topping (optional) |
| Salt 🧂 | ½ tsp | Fine sea salt preferred |
| Melted Chocolate 🍫 | ¼ cup | For drizzling (optional) |
The graham cracker crumbs are the foundation, so crush them finely—no one wants a mouthful of texture. Trader Joe's sells pre-crushed crumbs that save time, but if you're doing it by hand, pulse them in a food processor. Butter matters here—use full-fat, unsalted for that rich flavor. The sugar is where you can splurge: superfine dissolves better, but regular works if you pulse it in a blender. I always grab the Karo corn syrup at the grocery store—it's reliable and keeps forever. The peanut butter? Natural style with just peanuts gives the best flavor, but creamy works too if that's what you've got.
No Reese's cups? Crushed Heath bars or homemade peanut butter cups work in a pinch—just make sure they're chopped small. Running low on corn syrup? Honey or maple syrup at half the amount changes the texture slightly but keeps it delicious. The whipped cream topping is optional, but if you skip it, melted chocolate drizzle adds that restaurant-quality touch. Pro tip: Chill your eggs for 10 minutes before adding—they'll whip up smoother. And if you're worried about the filling being too sweet, trust me, the Reese's cups balance it perfectly.
This pie needs time to set, so chill it for at least 4 hours—overnight is ideal. Store leftovers in the fridge for up to 5 days, but honestly, it disappears fast. The crust stays crispy if you keep it in an airtight container. For serving, dust with powdered sugar right before slicing—it adds that professional finish. Freeze individual slices for up to 3 months if you're prepping ahead. Just let them sit at room temp for 10 minutes before serving.
Why You'll Love This Recipe
- No-Fuss Layers: I swear by this crust—just melt butter into graham crumbs until it’s just sticky, then press. No rolling, no stress, and it holds up like a dream. The Reese’s cups get chopped and folded right in, so you’re not fussing with layers or waiting for anything to set.
- Double Chocolate-Peanut Magic: That creamy peanut butter filling? It’s already rich, but the crushed Reese’s cups take it over the top. The chocolatey crunch in every bite is like a hug for your taste buds—sweet, salty, and so satisfying, you’ll forget it’s basically dessert in pie form.
- Party in a Pan: Honestly, this is my go-to for birthdays, game days, or just because. Serve it warm with vanilla ice cream and it’s a crowd-pleaser, or chill it for a no-bake treat that’s always a hit. The crust stays crisp even when the filling’s melty—no soggy bottoms here.
- Budget-Friendly Indulgence: You’re using pantry staples—peanut butter, sugar, graham crackers—and a handful of Reese’s cups to stretch the flavor. A single pie feeds six, and leftovers? They disappear faster than I can say “second slice.” Plus, no fancy ingredients means no wasted money.
Step-by-step instructions for peanut butter pie with Reese's peanut butter cups
Here's how to create the ultimate peanut butter pie—rich, creamy, and packed with Reese's swirls!
Prepare the Crust
Preheat your oven to 350°F. In a medium bowl, combine the 2.5 cups graham cracker crumbs with the 0.5 cup melted unsalted butter. Mix until the crumbs are evenly moistened and the mixture holds together when pressed. This ensures a sturdy crust that won't crumble when you cut into it.
Press the mixture firmly into the bottom of a 9-inch pie dish, creating an even layer. Use the back of a measuring cup to compact it tightly. Bake for 10 minutes, then remove from the oven and let it cool slightly—this prevents cracking when you add the filling. The crust should look golden and set but still slightly soft to the touch.
Make the Peanut Butter Filling
In a large mixing bowl, whisk together the 2 cups peanut butter, 1.5 cups granulated sugar, 0.5 cup light corn syrup, 4 whole large eggs, 2 teaspoons vanilla extract, and 0.5 teaspoon salt until completely smooth. The mixture should be thick but pourable—this ensures a silky texture in your pie. If it’s too thick, add 1 tablespoon of warm water to loosen it.
Pour the filling over the cooled crust and spread it evenly with a spatula. The filling should reach just below the top edge of the crust—this prevents overflow during baking. Return the pie to the oven and bake for 25-30 minutes, until the center is just set but still slightly jiggly. Overbaking will make the filling dry and crumbly.
Add the Reese's Swirls
While the pie is still warm, remove it from the oven and let it cool for 10 minutes. Chop the 16 whole Reese's peanut butter cups into small, even pieces—about ¼-inch cubes. Gently swirl the chopped cups into the top of the filling using a knife or spoon. Press them slightly into the filling so they stay in place and create those delicious pockets of peanut butter and chocolate.
Return the pie to the oven and bake for an additional 10-12 minutes, just until the Reese's pieces are softened but not melted. This step is key—it ensures the chocolate stays firm enough to hold its shape while still blending beautifully with the peanut butter filling. Let the pie cool completely before refrigerating, as this allows the flavors to meld and the texture to set perfectly.
Chill and Finish
Refrigerate the pie for at least 4 hours, or preferably overnight. This step is non-negotiable—it allows the filling to firm up and develop its signature creamy texture. While it chills, whip the 1 cup heavy whipping cream until soft peaks form. Spread the whipped cream over the top of the pie, then dust lightly with the 0.5 cup powdered sugar for a sweet, snowy finish.
For an extra touch, drizzle the 0.25 cup melted chocolate over the whipped cream in a zigzag pattern. Let the chocolate set for 10 minutes before serving. The contrast of the cool, creamy pie with the warm, gooey Reese's swirls is what makes this dessert unforgettable. Slice and serve chilled, and enjoy every decadent bite!
Pro Tips For Making Peanut Butter Pie With Reese'S Peanut Butter Cups
- MELT THE BUTTER SLOWLY: I learned this the hard way—dumping all the butter into the graham cracker mix at once makes greasy clumps that won’t bind. Instead, melt the butter first (microwave in 20-second bursts, stirring between), then drizzle it gradually into the dry crumbs while mixing. The heat helps the crumbs absorb it evenly, and you’ll end up with a crust that holds together like it should.
- USE CREAMY PEANUT BUTTER ONLY: Choppy peanut butter? Nope. This isn’t the time to skimp. The filling relies on smooth, creamy peanut butter for that velvety texture—choppy just won’t cut it. If you’re using Reese’s cups for extra richness, chop them after mixing the filling so they melt into the base rather than sitting as chunks. (Yes, even if you’re impatient like me.)
- CHILL THE CRUST LONGER THAN YOU THINK: I used to rush this step, but here’s the deal: The crust needs at least 30 minutes in the fridge (or even better, overnight) to set up properly. Skipping this means a soggy bottom when you pour the filling. Press the crust into the pan firmly—pack it like you’re making a pie crust, not just sprinkling crumbs. It makes all the difference when the pie goes in the oven.
- DON’T OVERMIX THE FILLING: Once you’re done blending the sugar, syrup, peanut butter, and eggs, stop stirring. Overmixing introduces air, and that leads to a filling that doesn’t set right—it’ll end up grainy or crack on top. Just combine everything until barely smooth, then pour. The Reese’s cups will melt into it naturally, and the texture stays perfect. Trust the process.
Wine and beer pairings for this recipe
Sweet Wine Pairings
This rich peanut butter pie deserves a wine that complements its sweetness without overpowering it. A Moscato d'Asti from Italy is my go-to choice—its light body and hints of peach and orange blossom balance the peanut butter's creaminess while enhancing the Reese's chocolate notes.
Serve it slightly chilled (45-50°F) to let its floral aromas shine against the pie's warmth. 🍷
Chocolate-Inspired Reds
For a bolder pairing, try a Cabernet Sauvignon with chocolate undertones, like a Napa Valley reserve. The dark fruit and cocoa notes in the wine mirror the Reese's cups, while the tannins cut through the pie's richness.
Look for bottles labeled "chocolate" or "cocoa" on the back label—I recommend Caymus Vineyards for their velvety finish. 🍇
Creamy Dessert Beer
Beer lovers shouldn't miss out! A Belgian-style dubbel like Westmalle Dubbel offers malty sweetness and caramel notes that harmonize perfectly with peanut butter. The pie's chocolate swirls play off the beer's subtle spice, creating a surprisingly elegant pairing.
For a lighter option, try a honey wheat beer—its citrusy brightness contrasts beautifully with the dessert's richness. 🍺
Coffee Liqueur Twist
If you're serving this pie after dinner, pour a Kahlúa or Tia Maria over ice with a splash of cream. The coffee's bitterness enhances the chocolate, while the creaminess mirrors the pie's texture.
Garnish with whipped cream and a sprinkle of cocoa powder for a dessert-inspired cocktail that pairs flawlessly. ☕
Non-Alcoholic Options
For guests who prefer non-alcoholic drinks, a chocolate milkshake made with whole milk and vanilla ice cream is a crowd-pleaser. The cold, creamy texture mirrors the pie's filling, while the chocolate flavor intensifies the Reese's experience.
For something lighter, serve sparkling peach tea—its effervescence cleanses the palate between bites. 🥤
Temperature Matters
Always serve your wine or beer slightly chilled (45-50°F) to enhance its aromas and prevent the alcohol from overwhelming the pie's delicate flavors. For beer, I recommend 40-45°F, while wine should never exceed 60°F.
Use an ice bucket or wine fridge to maintain the perfect temperature—your guests (and their taste buds) will thank you! ❄️
Nutrition facts
Frequently asked questions
Can I make this peanut butter pie without Reese's cups?
Yes! You can substitute with 16 chopped Heath bars or homemade peanut butter cups made from melted chocolate and peanut butter. For a nut-free version, try chopped white chocolate or mini chocolate chips—just reduce the amount to 1 cup total to avoid overpowering the filling. The key is keeping the pieces small and evenly distributed.
Why does my peanut butter filling crack after baking?
Cracking usually happens when the filling cools too quickly or isn't chilled long enough before baking. Always pre-chill the filling for 4+ hours to thicken it properly, and bake at 350°F—never higher. If cracks appear, cover them with whipped cream or melted chocolate to disguise them. For extra insurance, add 1 tablespoon of cornstarch to the filling mixture.
How long can I store this pie?
Store leftovers in an airtight container in the fridge for up to 5 days, though the filling may firm up more over time. For longer storage, freeze individual slices (wrapped tightly) for up to 3 months. Thaw overnight in the fridge—never at room temperature. The crust stays crispy if kept sealed, but the filling may soften slightly.
Can I make this pie in a springform pan?
A 9-inch springform pan works perfectly—just grease it well to prevent sticking. The crust will hold together better than a deep-dish pie, and the filling sets more evenly. For extra stability, press the graham cracker crumbs 1/4-inch thick at the bottom and sides. The springform also makes slicing easier without crumbling.
What's the secret to a perfectly smooth peanut butter filling?
The secret is room-temperature eggs and low heat when melting butter. Whisk the eggs and peanut butter together gently to avoid incorporating air, which causes lumps. For ultra-smooth results, strain the mixture through a fine-mesh sieve before pouring. Also, chill the filling overnight—this eliminates any graininess and ensures a silky texture.