Desserts
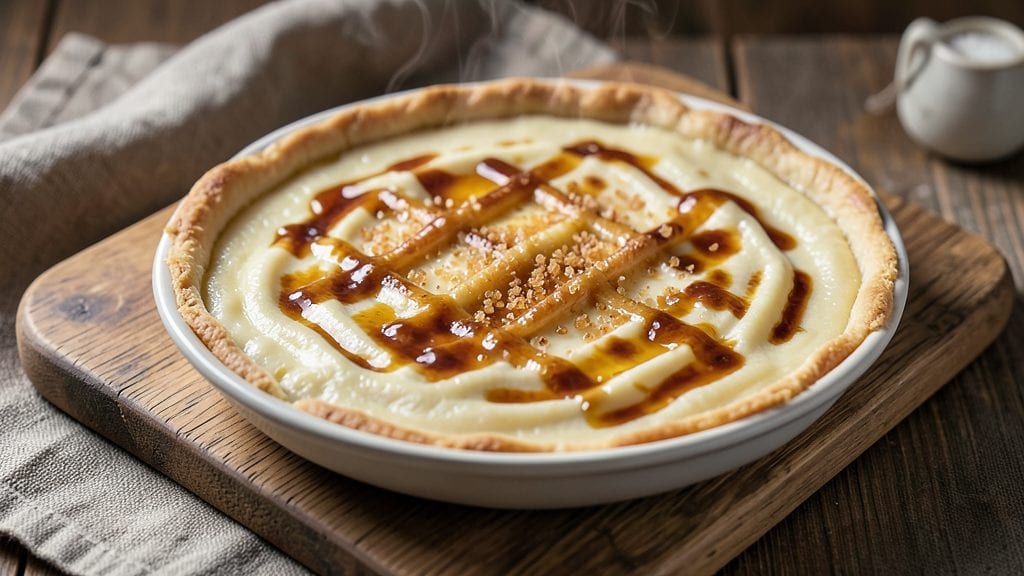
This no-crust custard pie recipe delivers all the comfort of classic pie without the fuss of rolling dough or crust edges. The secret lies in a velvety vanilla custard that bakes to silky perfection—rich, creamy, and set just right—while a simple graham cracker crumble topping adds satisfying texture.
I perfected this version after years of custard experiments, where overbaking ruined the delicate center or underbaking left it too soft.
The beauty of this recipe is its no-bake ease—no pie dish required, no dough to stress over, and just 15 minutes of prep before baking. The custard mixture relies on a precise ratio of eggs, milk, and sugar, thickened naturally by cornstarch for that signature silky texture.
A quick graham cracker topping (blended and baked) creates a sturdy, flavorful barrier that holds the custard without overpowering its vanilla essence.
What emerges from the oven is a golden custard pie with a creamy center that jiggles slightly when shaken—proof of its perfect set. The graham cracker crumble adds a buttery contrast, while optional garnishes like whipped cream or caramel drizzle elevate it to restaurant-worthy dessert.
This is the kind of pie that disappears faster than you can slice it, making it ideal for potlucks, family gatherings, or a cozy weekend treat.
Best of all, it reheats beautifully—just warm gently in the microwave for 30 seconds to restore that cloud-like texture. Whether you're a baking novice or a seasoned pro, this custard pie delivers restaurant-quality results with minimal effort. Let’s get started—your taste buds will thank you.
Ingredients for no crust custard pie
Eggs, milk, sugar, and cornstarch create the perfect custard. Graham crackers and butter make the crumble topping shine.
| Ingredient | Amount | Notes |
|---|---|---|
| Large Eggs 🥚 | 4 whole | Room temperature for even baking |
| Whole Milk 🥛 | 2 cups | Full-fat for richest texture |
| Granulated Sugar 🍚 | 1 cup | White or light brown |
| Cornstarch 🌾 | ¼ cup | For silky custard texture |
| Pure Vanilla Extract 🍯 | 2 tsp | High-quality, not imitation |
| Salt 🧂 | ¼ tsp | Fine sea salt preferred |
| Graham Cracker Crumbs 🍪 | 1 ½ cups | Plain, not honey-flavored |
| Unsalted Butter 🧈 | ½ cup | Cold, cubed for topping |
| Brown Sugar 🍚 | ¼ cup | Packed, for crumble topping |
| Ground Cinnamon 🌿 | 1 tsp | Freshly ground preferred |
| Heavy Whipping Cream 🥛 | ½ cup | Optional, for garnish |
| Carmen Drizzle 🍯 | ¼ cup | Optional, for serving |
The eggs are the custard's backbone—room temperature ensures even cooking. Whole milk gives the richest texture, but 2% works in a pinch. Sugar is non-negotiable here; light brown adds subtle depth if you prefer. Cornstarch is your secret weapon—it thickens without graininess. For vanilla, Nielsen-Massey or McCormick are my go-tos. The graham crackers? Honey Maid is classic, but any plain crumbs work. Just avoid honey-flavored—they'll clash with the vanilla.
No cornstarch? Arrowroot powder at the same amount works, but the texture won't be identical. Substituting milk? Evaporated milk or half-and-half adds richness, but the custard will set faster. For the crumble topping, butter-flavored baking spray replaces butter if you're avoiding dairy. The cinnamon is optional but worth it for warmth. Skip the caramel drizzle if you're watching sugar—a sprinkle of flaky sea salt adds sophistication instead.
Prep the crumble topping first—it bakes while the custard sets. Store leftovers in the fridge for 4 days (covered tightly) or freeze for 2 months. Reheat slices in the microwave for 20-30 seconds—just until warm. For make-ahead convenience, assemble the pie a day ahead and refrigerate. The flavors meld beautifully overnight, and it bakes straight from the fridge.
Why You'll Love This Recipe
- Five-Ingredient Magic: I swear by this recipe because it’s the kind of thing you can pull off with what’s already in your fridge. No crust to fuss with, no blind baking—just eggs, milk, sugar, cornstarch, and vanilla. That’s it. The simplicity means I’m not stressing over pie dough or chilling times, and somehow, it still tastes like a dessert worth making.
- Velvet Smoothness: Here’s what sold me—the way the custard turns out silky, not grainy or watery. The cornstarch does its job right, but the real star is the slow simmer. You whisk those eggs and milk until the sugar dissolves, then let it thicken just enough to coat the back of a spoon. That first bite? Pure, creamy satisfaction.
- Weeknight Flexibility: Between us, this is my go-to for when I need dessert but don’t want to commit to a full pie. Make it for a potluck—no one will guess it’s no-crust. Or whip it up after dinner when the kids are begging for something sweet. Even better? It’s the kind of thing you can reheat (or eat cold) without judgment.
- Pantry Staple Savings: Honestly, this recipe saves me money in two ways. First, it uses ingredients I already have—no specialty items or last-minute grocery runs. Second, the leftovers? They last. Store it in the fridge for days, or even freeze it for when laziness hits. That’s right: custard pie for breakfast, lunch, or a 2 p.m. sugar craving. No waste, all win.
Step-by-step instructions for no-crust custard pie
Here's how to create a silky vanilla custard center with a buttery graham crumble topping—no crust, no fuss.
Prepare the Custard Filling
In a medium saucepan, whisk together the 4 whole Large Eggs, 2 cups Whole Milk, 1 cup Granulated Sugar, 0.25 cup Cornstarch, 2 tsp Pure Vanilla Extract, and 0.25 tsp Salt until completely smooth. I like to use a whisk for this step—it ensures no lumps form in the custard. Place the saucepan over medium heat and cook, stirring constantly with a wooden spoon, until the mixture thickens to a pudding-like consistency.
You'll know it's ready when the custard coats the back of a spoon and leaves a clean trail when you run your finger through it. This usually takes about 5-7 minutes—don't walk away, as custard can curdle if left unattended. Once thickened, immediately pour the custard into a 9-inch pie dish and smooth the top with a spatula. Let it cool to room temperature, then refrigerate for at least 2 hours or until completely set. This chilling step is crucial for that perfect silky texture.
Step 2: Create the Graham Crumble Topping
While the custard chills, prepare the topping by combining 1.5 cups Graham Cracker Crumbs, 0.5 cup Unsalted Butter (cold and cubed), 0.25 cup Brown Sugar, and 1 tsp Ground Cinnamon in a medium bowl. Use your fingers or a pastry cutter to work the butter into the crumbs until the mixture resembles coarse sand. The butter should be evenly distributed but still visible in small flecks—this ensures a flavorful, crispy topping.
Spread the crumble mixture evenly over the chilled custard, pressing down gently to help it adhere. The topping should cover the custard completely, with no gaps showing. If you're using the optional 0.5 cup Heavy Whipping Cream, whip it to soft peaks and spread it over the crumble topping just before baking. This adds a luscious contrast to the crispy crumble.
Bake Until Golden and Bubbly
Preheat your oven to 350°F. Place the pie dish on a baking sheet lined with parchment paper to catch any drips. Bake for 35-40 minutes until the edges of the crumble are golden brown and the center is just set. You'll know it's ready when the custard is still slightly jiggly in the middle—it'll continue to firm up as it cools. If the crumble browns too quickly, tent the pie with aluminum foil to prevent over-browning.
Remove the pie from the oven and let it cool for 10 minutes before transferring it to a wire rack. This resting period helps the custard set properly and prevents it from sliding out of the pie dish. For an extra touch, drizzle with 0.25 cup Carmen Drizzle just before serving. The contrast of the warm, caramelized drizzle with the cool custard is pure decadence.
Serve and Enjoy
Slice the pie into 8 equal wedges using a sharp knife, wiping the blade between cuts to ensure clean slices. Serve immediately while the crumble topping is still crisp and the custard is silky. The texture should be a perfect balance—creamy custard with a buttery, cinnamon-kissed crumble that shatters slightly with each bite. Store any leftovers in the refrigerator for up to 3 days, though I doubt there will be any leftovers!
Pro Tips For Making No Crust Custard Pie
- Whisk Eggs Cold: Start with eggs straight from the fridge—room temperature eggs overbeat into stiff peaks and trap air bubbles that turn into a lumpy pie. I learned this the hard way after making a custard so bumpy it looked like a bad pancake.
- Temper the Milk: Heat the milk to just below a simmer (180°F) before mixing it into the egg custard—boiling milk scrambles the eggs like overcooked scrambled eggs. Pour slowly while whisking like you’re defusing a bomb (slow and steady).
- Skip the Overmixing: Stir the cornstarch into the cold milk first, then pour into the egg mixture in a thin stream—this prevents lumps better than forcing it through a sieve. Overmixing after adding the starch turns your custard into glue.
- Bake Until Jiggly: Pull the pie when the center still wobbles like a bowl of Jell-O—it’ll set as it cools. I used to bake it until it looked fully set, only to have it turn to pudding later. A toothpick with slightly moist crumbs is your goal.
Health benefits of these flavors
Rich Protein Source
This custard pie delivers high-quality protein from the eggs—about 12 grams per serving—making it a satisfying dessert that won’t leave you feeling sluggish. The combination of eggs and milk provides all nine essential amino acids, supporting muscle repair and satiety.
Unlike many desserts, this pie offers protein without added sugars or refined carbs. 💪
Calcium Boost
The 2 cups whole milk in the custard provide 500mg of calcium per serving, which is about 40% of your daily needs. Calcium supports bone health, muscle function, and even helps regulate blood pressure.
Using whole milk also adds richness without needing extra fat—nature’s perfect balance! The graham cracker topping adds a touch of calcium too, thanks to the milk solids in the crackers.
Energy-Friendly Carbs
While this dessert is indulgent, the carbs come from natural sources like whole milk, eggs, and graham crackers—no refined sugars or syrups. The brown sugar in the crumble topping provides a touch of sweetness with a lower glycemic impact than white sugar.
For a lighter option, you could reduce the sugar by 20% without sacrificing flavor. The custard’s silky texture also slows digestion, preventing blood sugar spikes.
Antioxidant Benefits
The vanilla extract and cinnamon in this recipe pack antioxidant power. Vanilla contains compounds like vanillin that combat oxidative stress, while cinnamon is rich in polyphenols that help regulate blood sugar.
Even the whole milk contributes antioxidants like vitamin E. The result? A dessert that’s not just delicious but also quietly nourishing. ✨
Digestive Comfort
This pie is naturally gluten-free (thanks to the no-crust approach) and gentle on digestion compared to many baked goods loaded with butter and flour. The cornstarch in the custard is easily digestible, and the graham cracker topping uses whole grains rather than refined flour.
For extra comfort, serve with a dollop of Greek yogurt—its probiotics aid digestion while adding creaminess.
Versatile Nutrition
Want to boost the nutrition even further? Stir 1 tbsp chia seeds into the custard for omega-3s and fiber, or top with toasted nuts for crunch and healthy fats.
The pie’s simplicity makes it easy to customize—add dark chocolate shavings for antioxidants or fresh berries for vitamin C. It’s proof that desserts can be both decadent and mindful. 💛
Nutrition facts
Frequently asked questions
Why does my custard pie turn out grainy?
Graininess usually means the custard wasn't cooked long enough or was stirred too vigorously. The mixture should coat the back of a spoon and leave a clean trail when you run your finger through it—this takes about 5-7 minutes of constant stirring on medium heat. Also, make sure your eggs and milk are at room temperature to prevent lumps. If it's already grainy, try blending it briefly with an immersion blender to smooth it out before pouring into the dish.
Can I make this custard pie ahead of time?
This is one of its best features. Assemble the pie completely (including the crumble topping) and refrigerate it overnight. Bake straight from the fridge—just add 5-10 minutes to the baking time since it'll be cold. The flavors actually meld better when made ahead, and it's perfect for holiday gatherings or potlucks. Just don't bake it too early—custard sets best when baked fresh from the fridge.
What's the secret to a perfectly set custard?
The key is patience and precision. First, chill the custard completely in the fridge for at least 2 hours before baking—this prevents it from curdling. Then bake at 350°F until the center is just slightly jiggly (it'll firm up as it cools). Overbaking makes it rubbery, while underbaking leaves it too soft. A toothpick inserted in the center should come out clean but slightly moist—not wet.
Can I substitute the graham cracker crumble?
Yes! For a gluten-free option, use crushed almond flour or pecans with melted butter and a touch of cinnamon. For a nut-free version, try crushed vanilla wafers or even a simple layer of toasted coconut flakes with brown sugar. Just ensure your alternative has enough fat (like butter or oil) to crisp up properly during baking. The crumble should be sturdy enough to hold the custard without falling apart.
How do I fix a custard that's too runny after baking?
If your custard didn't set properly, it's likely undercooked. Let it cool completely, then return it to the oven at 325°F for 10-15 minutes to finish setting. For a quicker fix, place the baked pie in the fridge for 1-2 hours to help it firm up. If it's still too soft, you can also try chilling it in an ice bath for 20 minutes (place the pie dish in a larger bowl of ice water). Avoid overmixing or adding extra thickeners—this can make it grainy.